No Internet Connection Mac? 8 Effective Methods to Get Internet Access
You can come across a circumstance where there is no internet connection Mac, despite the fact that it is connected to the Internet via Wi-Fi. This could be due to a variety of factors. There may be a problem with your router, Internet service provider, or software on your MacBook. Whatever the source of your issue, the 10 tips below should help you solve it.
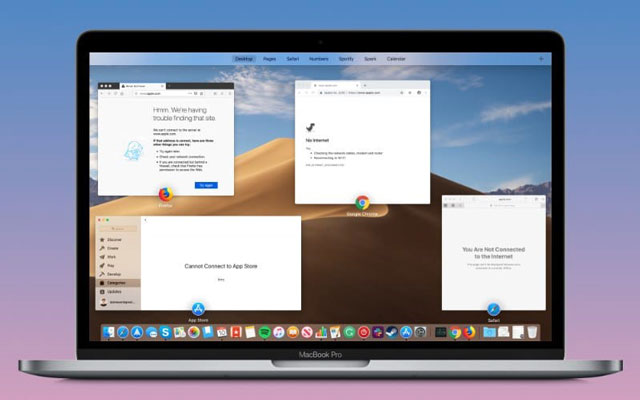
No internet connection on MacBook
1. Restart both the MacBook and the router
Restarting your Mac is usually a rapid and dependable solution. Choose Restart from the Apple icon in the top left corner. Carry out the same procedure with your router. The Wi-Fi difficulties should be resolved once the Mac is turned on.
See also: Amazon Fire Stick keeps losing internet connection
2. Disconnect from the Wi-Fi Network and reconnect
Conflicting network information can cause mayhem at times. In such instances, a new Wi-Fi connection could be really beneficial. To turn off Wi-Fi on your Mac, follow the steps below.
-
Go to System Preferences > Network on your MacBook
-
In the sidebar, select Wi-Fi, then Advanced... in the bottom right
-
Use the Minus (–) button, select your Wi-Fi network from the list and delete it
-
After that, click OK and then Apply
-
Reconnect by entering the password again
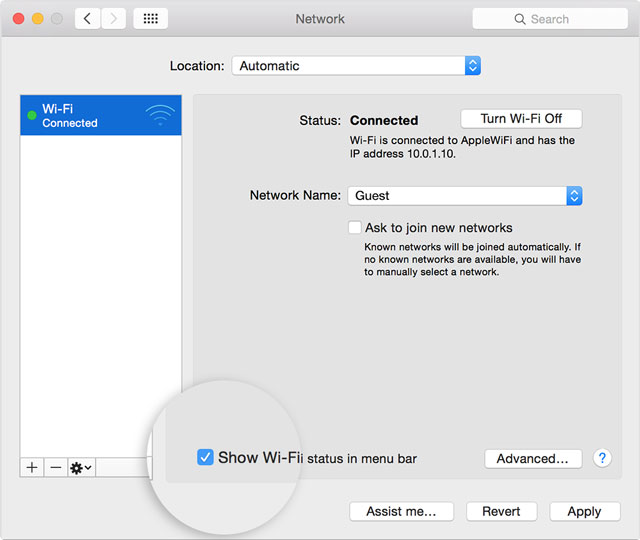
Forget Wi-Fi Network
3. Update your Mac's operating system
MacOS versions that are outdated or older may cause connectivity troubles. The best solution is to upgrade to the most recent version of macOS.
-
Go to System Preferences > Software Updates on your MacBook
-
Allow your MacBook to check for fresh updates while you wait
-
Download and install any updates that are available
4. Change the Domain Name System on your Mac (DNS)
DNS (Domain Name System) is a protocol that allows browsers to communicate with the internet. The DNS converts domain names into IP addresses for the browser whenever we input them in.
Changing your DNS provider from your Internet provider to a free public service such as Google or Cloudflare might sometimes help your Mac connect to the internet more quickly.
To modify your DNS, follow the process below.
-
All browsers should be closed
-
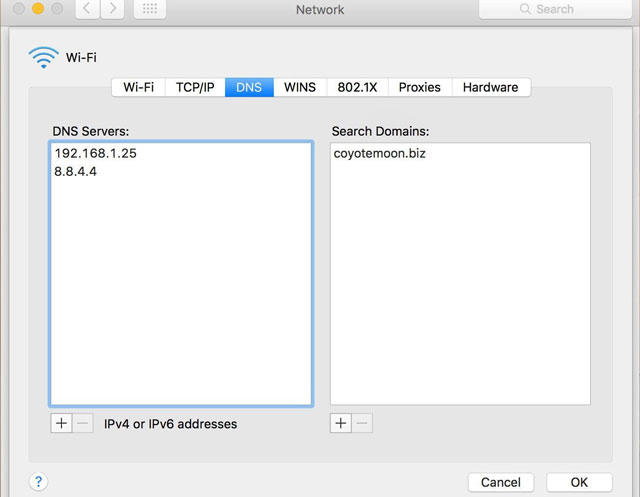
Open Network Preferences in System Preferences. Choose Wi-Fi
-
Go to the Advanced menu and then to the DNS tab
-
To add an IPv6 DNS server of your choosing, click the Add button
-
Google's primary IP address is 8.8.8.8, and its secondary IP address is 8.8.4.4
-
Cloudflare's primary and secondary IP addresses are 1.1.1.1 and 1.0.0.1, respectively
-
Select OK when you're finished
Change the DNS on Mac
5. Disconnect all USB devices
USB accessories that aren't working properly can cause problems with your connectivity. Shielding should be present on USB devices and other peripherals attached to your MacBook. Remove all USB accessories from your Mac and see what happens.
See also: Avast is blocking my internet connection
6. In Network Preferences, re-enable the DHCP Lease
The Dynamic Host Configuration Protocol (DHCP) is a protocol that allows your network devices to communicate with one another. Your router, MacBook, iPhone, and anything else on your network are examples of these devices.
-
Open Network Preferences in System Preferences
-
Select Advanced from the Wi-Fi menu
-
Activate the TCP/IP tab
-
Select Renew DHCP Lease from the drop-down menu
7. Make a brand-new network location
When you connect to the internet, Mac assigns a location. The internet will stop working if there are any errors in the specified location. Follow the process below can help you.
-
Navigate to System Preferences Network
-
Select Edit Location from the drop-down menu next to Location
-
To add a new location, click +
-
Click Done → Apply
8. Renewal Network Preferences
Certain network preferences may be interfering with connectivity and causing problems. To reset network preferences, follow the steps outlined below.
-
Launch Finder select Navigate to the top menu bar.
-
Select Computer, then open Macintosh HD and navigate to the Library folder.
-
Select System Configuration from the Preferences menu.
-
Look for and remove the following files:
-
com.apple.airport.preference.plist
-
com.apple.network.identification.plist
-
NetworkInterfaces.plist
-
preferences.plist
-
Settings.plist
Conclusion
I hope this guide covers all of your bases and helps you resolve the “no internet connection Mac” issue. Besides, you can check internet connection at MySpeed to better understand your Mac before taking it to an Apple service center. Please let us know if you have any further questions.

![What Type of Internet Connection Do You Have When Upload Speed Differs from Download Speed? [Solved]](https://gospeedcheck.com/filemanager/data-images/what-types-of-internet-when-upload-speed-differs-from-download-speed.png)


0 Comments
Leave a Comment
Your email address will not be published. Required fields are marked *