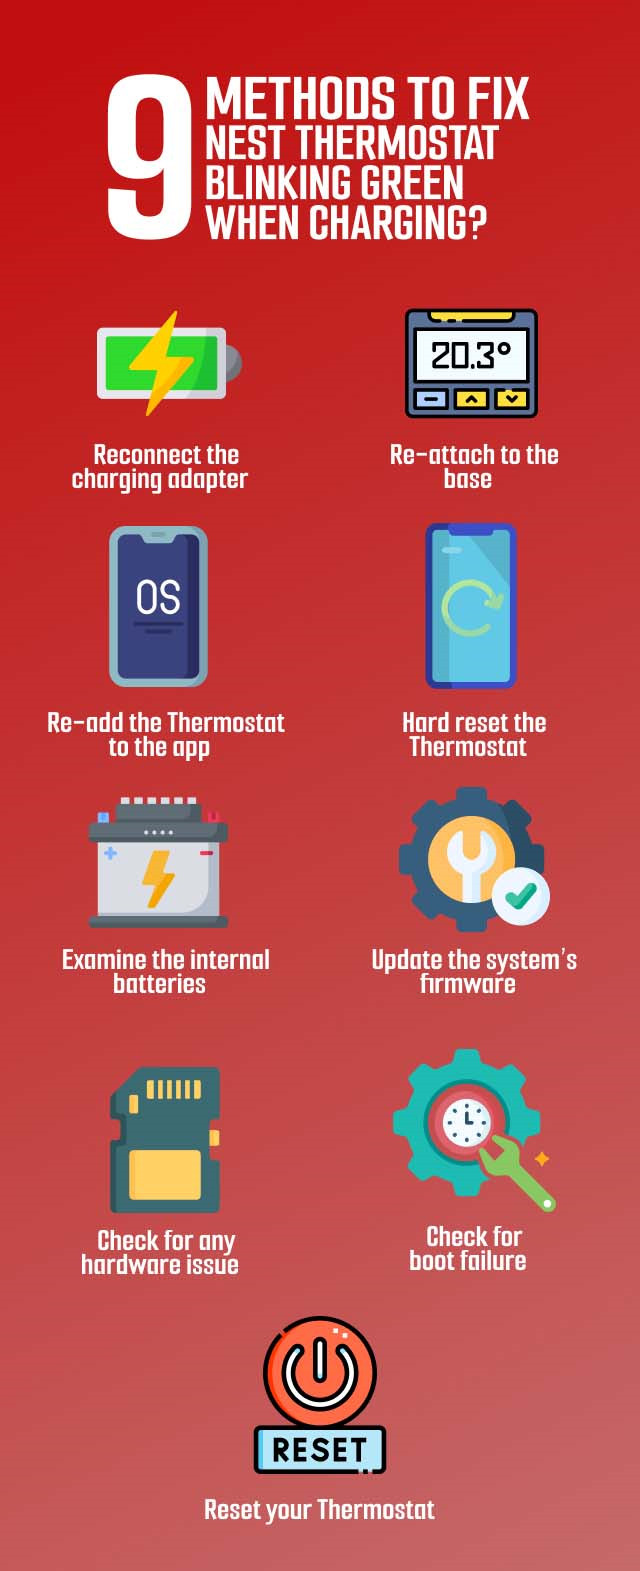
Nest Thermostat blinking GREEN when charging: 9 simple fixes
A Nest thermostat blinking green when charging indicates a software update for your system.
So if you see it, wait a few minutes for the update to complete.
Yet, something unusual might happen if the light flashes for a long time, stays on, or is in a different color.
Read on for the main causes and quick fix your Nest Thermostat blinking in the article below.

Nest thermostat flashing light
What does the Nest Thermostat Blinking Green Mean?
Google software’s changes can lead to the green light flickering on your Nest devices.
Nest thermostats are updated regularly, like most other smart devices.
Your Nest Thermostat gets frequent software updates from Google to give your device optimal performance.
It's a good sign when you find a green light since it indicates that your Nest is rebooting, updating, and installing.
.png)
Nest Thermostat blinking green
However, the update, installation, or reboot may not cause your Nest thermostat's flashing green light for a long time.
So, you can check the minor issue through a green light that lasts for a long time.
Why is Nest Thermostat Blinking Green When Charging?
What causes the Nest device flashing green when you charge it?
Let’s take an insight look into the specific reasons:!
Nest Thermostat Fails to Boot
When Nest fails to boot because of a faulty battery, you can not charge it.
The one tacking its power supply is the most suitable solution for the boot issue.
.png)
Nest thermostat fails to boot
Read also: How to connect Alexa to Wifi without the app?
Nest Thermostat Is in Reboot Loop
A reboot loop is one of the potential problems from various instances, such as problems with the charging.
Although you plugged your thermostat into the power supply, you must double-check whether the electricity goes into your device properly.
.png)
The nest thermostat is in the reboot loop
Nest Thermostat’s Software Got Bricked
Nest’s power is compromised when charging if the power flow is improper.
This leads to power fluctuations affecting the constant software update process and bricking the Nest’s interface.
You can completely make a hard reset to solve this problem.
Start troubleshooting the problem after you are aware of the problem with elapsed 15 minutes.
.png)
Nest software got bricked also caused the blinking green
Other Causes
-
System shut down or start-up: One of the most popular causes the system flashes the green light is that such a flashing light is generated because the system's power is turned on or off.
-
A system undergoing an update: Another possibility is that your device is undergoing an update, causing such a response.
-
System failure: If there is a power failure, your system can flash green for a few minutes until the issue is fixed. Failure appearing on your system will prevent it from continuously flashing green light.
-
Software malfunction: Bugs, glitches, or errors can lead to software problems in your device, resulting in a flashing green light.
-
Hardware problems: Hardware issues, like software issues, can prevent your system from functioning properly.
Notably, blinking green when charging is not the only issue of a Thermostat.
If you use a Honeywell device, you’ll see that Honeywell Thermostat heat not working on auto is such a terrible headache.
How to Fix Nest Thermostat Blinking Green When Charging?
After knowing the causes of the Nest blinking green, you need a complete guide to stop it quickly.
Follow the steps below for doing this:
Fixing Nest thermostat flashing green when charging
Reconnect the Charging Adapter
Reconnecting the charging adapter is ideal for fixing the blinking green light on Nest.
The Nest device must be removed from its base to be charged.
You should remove the power dividers and plug the device directly into the wall outlet.
Wait a moment to check if the green light flashing still comes on and try the other solution.
.png)
Reconnect the charging adapter
Re-Attach to the Base
You should re-attach the thermostat to the base and recharge it if the green light continues flashing.
This way will support you in refreshing the thermostat and preventing power fluctuations.
.png)
Insert the thermostat into the base
Here is a detailed step you can follow:
-
Step 1. Remove the Nest device from the charging port by unplugging it
-
Step 2. Re-attach it to the base
-
Step 3. Type the menu by sliding about two times the adjustable screen
-
Step 4. Identify if your thermostat runs now
Re-add the Thermostat to the App
You can also try re-adding your device to a mobile app if the green light still flashes on the Nest thermostat.
It will flash the green light indicating your thermostat can not control the cooling or heating in the HVAC system because it is in a reboot loop.
.png)
Re-add Nest thermostat to the app
Follow the instructions below to re-add the thermostat to the mobile app:
-
Step 1. Access “Devices Tap” by opening the mobile Nest app on your phone
-
Step 2. Select “Forget” and choose the problematic thermostat when you get various ones
-
Step 3. Choose “Add New Device” to insert Nest into the base of th phone
-
Step 4. Follow the on-screen guide to install your Thermostat back into your app
Hard Reset the Thermostat
You should perform the hard reset of the thermostat if it is flashing green when charging.
This will reset all services with the whole Nest system and stop the green light from flashing easily.
.png)
Make a hard reset on the thermostat
The instruction below will help you make a hard reset Nest successfully:
-
Step 1. Unplug your Nest device from the charging source
-
Step 2. Push the “ring: on your device and hold it down for about 10 seconds
-
Step 3. Press the button once after releasing it to reboot your Thermostat
Examine the Internal Batteries
If there’s a problem with the internal batteries, the green light on Nest will blink.
You still charge the internal device as you’ve plugged it into the charger, and it doesn’t require the separated batteries.
.png)
Examine the internal batteries
These steps will allow you to examine the internal batteries:
-
Step 1. Disconnect your thermostat from the battery charger
-
Step 2. Press the “ring” button to shut the device for about 10 seconds
-
Step 3. Use a screwdriver to adjust the screws on the Nest’s back
-
Step 4. Remove the battery compartment cover after loosening the screws
-
Step 5. Check the compartment for battery leaking or amortizable signs.
-
Step 6. Re-install the battery and compartment
Update the System’s Firmware
The next way to solve the blinking light error is to let the system update the firmware, as the system may display such blinking lights while the firmware is in progress.
The update can take 30 minutes or more if the size is too large.
So check the Nest app on your phone until the update is complete.
.png)
Update Nest’s firmware
Check For Any Hardware Issue
If you update the software and do not solve the problem, just check the hardware problem.
However, we recommend that you contact Nest engineers.
Nest engineers look for hardware defects that are not easily found.
Furthermore, it can save money, so it is great if the device has a guarantee.
.png)
Check if there is any hardware issue with Nest
Check for Boot Failure
Finally, you can try checking for boot errors if the above ways are ineffective.
A faulty battery may cause the system to fail to boot and flash green while charging.
.png)
Check for boot failure on Nest
Besides, the system can get stuck in a reboot loop, creating a hurdle.
This can happen, for example, during a power outage.
If this happens, check your power supply.
Reset your Thermostat
You can perform a factory reset on your thermostat if the problem still continues.
This solution can clear all settings to the default state to solve potential charging problems.
After resetting your thermostat, you can run a wifi speed test to check if your connection is stable or if you have slow Wifi speeds.
.png)
Reset the Thermostat
To reset your Nest Thermostat, use the steps below:
-
Step 1. Remove the device from the charging depot by disconnecting it.
-
Step 2. Reinsert the thermostat into the wall.
-
Step 3. Access “Settings” in the “Quick View Menu”.
-
Step 4. Heat “Reset” and choose “All Settings”.
-
Step 5. Heat the ring once to reset your device.
Charging times for the Nest device can change from 30 minutes to 1 hour.
A full charge takes 30 minutes with the USB cable and up to 2 hours to fully charge the thermostat when the battery is fully discharged.
The red light on Nest flashes while charging.
On some models, the color stays the same while the battery is charging and stops flashing when the battery is fully charged.
The 2nd generation Nest Learning Thermostat may flash orange and green.
If it blinks amber and green quickly, it's being restored to factory settings.
Color changes between blue (cooling), orange (heating), and black are based on the system's current state.
You may also observe messages such as Heat set or Cooling.
The Thermostat screen will turn off if it detects no recent operations nearby.
Conclusion
Your Nest thermostat could be blinking green for multiple reasons. The most common reasons are system errors, boot failures, low battery or power outages, software issues, and hardware issues. You can easily avoid these causes with the step-by-step guide on fixing Nest Thermostat blinking green when charging.

![Honeywell Thermostat turns ON and OFF frequently [Disclosed]](https://gospeedcheck.com/filemanager/data-images/imgs/20221025/honeywell-thermostat-turns-on-and-off-frequently.png)
8 Comments
Jared Thompson
I always like how comprehensive you are in your articles, very detailed. This is more of a book than an article
Leave a Comment
Your email address will not be published. Required fields are marked *MySpeed
Sounds good
Leave a Comment
Your email address will not be published. Required fields are marked *William Brown
Do Nest batteries need to be replaced?
Leave a Comment
Your email address will not be published. Required fields are marked *MySpeed
The Nest Thermostat uses 2 standard 1.5 V AAA alkaline batteries that you'll need to replace when they get low
Leave a Comment
Your email address will not be published. Required fields are marked *Grace Marshall
How do I know if Nest battery is low?
Leave a Comment
Your email address will not be published. Required fields are marked *MySpeed
Your Nest Thermostat will let you know with a low battery message in the Home app and on the display
Leave a Comment
Your email address will not be published. Required fields are marked *Joyce Parker
How do I know if my Nest is charging?
Leave a Comment
Your email address will not be published. Required fields are marked *MySpeed
A blinking light on the front of your thermostat confirms that it's charging. The color of the light will depend on the battery level of the thermostat when you charge it
Leave a Comment
Your email address will not be published. Required fields are marked *Leave a Comment
Your email address will not be published. Required fields are marked *